Pi-Plates THERMOplate User’s Guide
Revision 1.1
Table of Contents
Overview
This document describes the features of the Pi-Plates THERMoplate board. In addition, it provides instructions on how to connect and read the temperature values from both Type K thermocouples and DS18B20 digital sensors .
- Although the examples below have been written for Python 2.7, the Pi-Plate modules are also compatible with Python3.
- If you haven’t already done so, got to the Getting Started page under Documentation on the Pi-Plates website and follow the instructions for setting up your Raspberry Pi. If you get a “spi” error when you run your script, you haven’t set up your Raspberry Pi yet.
- Finally, all of the code examples below assume that the THERMOplate module was imported with the following statement:
|
1 |
import piplates.THERMOplate as THERMO |
Board Layout
Each of the inputs to the THERMOplate are shown below. Note that we have used plugable terminal blocks on this Pi-Plate to simplify making modifications after the stack has been assembled.

Setup
Selecting Board Address
Up to eight THERMOplates can be used in a single stack of Pi-Plates. To do this, each board has to be set to a unique address. When shipped, the THERMOplate is set to address zero. The address is set by positioning jumpers on the small, six pin header in the upper area of the board as shown in the image above. Use the diagram below to set the address:
 Starting with the THERMOplate, it is now possible to change the address of the board without having to perform a power cycle.
Loading the Python Modules
Like all previous Pi-Plates, the python modules can be installed by using the pip utility from the command line interface. First, make sure your Raspberry Pi is connected to the internet. Then, remove any old modules with:
|
1 |
$sudo pip uninstall Pi-Plates |
Then install the latest modules with:
|
1 |
$sudo pip install Pi-Plates |
If you prefer to use python3 then use:
|
1 |
$sudo pip3 install Pi-Plates |
Thermocouples
About
Thermocouples are simple devices that consist of two dissimilar metals bonded together to form an electrical junction. As the temperature changes, this junction produces a very small voltage. On the THERMOplate, this voltage is amplified and measured by the analog to digital converter. Because the voltage is so small, a good deal of averaging and filtering is performed for every reading. THERMOplates are designed and calibrated for use with type K and type J thermocouples. They are inexpensive, reasonably accurate, reliable, and have a wide temperature range. Go here for more information on the physics of thermocouples.
Connecting
The THERMOplate has eight thermocouple inputs on the front of the board:
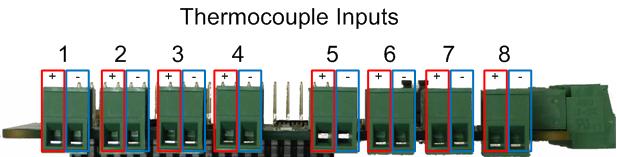
Each input has a plus and minus terminal. The guide below shows the common markings for type K and type J thermocouples:

If you’re still not sure, a magnet can be used to test the minus terminal wire since it is magnetic. Note that the K-type thermocouples sold by Pi-Plates employ the German wire colors but this is subject to change. Below is one of ours screwed into the terminal block plug before being attached to socket. Don’t be like us and leave so much exposed wire.

Reading Thermocouple Temperature Values
If we assume that there is a single K type thermocouple connected to input 1, then reading the temperature can be performed with the following python script:
|
1 2 3 4 5 6 7 |
import piplates.THERMOplate as THERMO import time while(1): t1=THERMO.getTEMP(0,1) print (time.ctime(),'Temperature on Channel 1:',t1) time.sleep(1) |
The above script loads the time and THERMOplate modules, reads the thermocouple data from channel 1 two times a second and then prints it to the screen as a Celsius value:
|
1 2 3 4 5 6 7 8 9 |
pi@raspberrypi:~ $ python example1.py Wed Jul 3 07:19:09 2019 Temperature on Channel 1: 25.512 Wed Jul 3 07:19:09 2019 Temperature on Channel 1: 25.512 Wed Jul 3 07:19:10 2019 Temperature on Channel 1: 25.515 Wed Jul 3 07:19:10 2019 Temperature on Channel 1: 25.515 Wed Jul 3 07:19:11 2019 Temperature on Channel 1: 25.518 . . . |
Notes:
- Unlike some high end devices, the THERMOplate can not detect the presence or absence of a thermocouple on the input. So, if your measurements are coming back with crazy values you might want to inspect your setup and confirm that your sensors are connected properly and plugged in.
- As mentioned earlier, Thermocouples produce very small voltages. Because of this, the THERMOplate converts and averages over four thousand samples to produce a single reading. This process takes about 0.6 seconds (0.72 seconds in Europe). To ensure “fresh” data, set your sample rate to about 1 sample per second.
- The setSCALE function can be used to choose global units of Centigrade, Farenheit, or Kelvin. In addition, it is possible to override the global units setting by specifying a scale in the getTEMP function. See the Advanced Topics section and the command reference at the end of this document for details.
- If you choose to use a J type thermocouple, insert the command THERMO.setTYPE(0,1,'j') before the while statement:
123456789import piplates.THERMOplate as THERMOimport timeTHERMO.setTYPE(0,1,'j')while(1):t1=THERMO.getTEMP(0,1)print (time.ctime(),'Temperature on Channel 1:',t1)time.sleep(1)
The DS18B20
About
The DS18B20 is a 1-Wire temperature sensor with a built-in 12-bit A/D and a specified accuracy of ±0.5°C over the range of -55°C to +125°C. They are a relatively inexpensive and very popular since they are digital and only require a single wire for operation. Go here to see the complete DS18B20 datasheet.
Connecting
DS18B20s are attached to the four, 3-pin terminal blocks on the side of the THERMOplate. Each one of these has a power, data (labeled 1W), and ground contact for the sensor:

The DS18B20 can be purchased as a discrete component or preassembled with wires and a protective tip. Pi-Plates sells the latter with 1 meter cables. In most cases the wires are colored red for 5V, black for Ground, and blue or yellow for the digital signal. Here is a picture of one of our cables connected to the terminal block plug:

Reading DS180B20 Temperature Values
The DS19B20 connectors are referenced as 9 through 12. If we assume that there is a single DS18B20 connected to input 9 then reading the temperature can be performed with the following python script:
|
1 2 3 4 5 6 |
import piplates.THERMOplate as THERMO import time while(1): t9=THERMO.getTEMP(0,9) print (time.ctime(),'Temperature on Channel 9:',t9) time.sleep(1) |
The above script loads the time and THERMOplate modules and, reads the DS18B20 data from channel 9 once a second, and prints it to the screen as a Celsius value:
|
1 2 3 4 5 6 7 8 9 |
pi@raspberrypi:~ $ python example2.py Wed Jul 3 07:22:04 2019 Temperature on Channel 9: 25.813 Wed Jul 3 07:22:05 2019 Temperature on Channel 9: 25.813 Wed Jul 3 07:22:06 2019 Temperature on Channel 9: 25.813 Wed Jul 3 07:22:07 2019 Temperature on Channel 9: 25.813 Wed Jul 3 07:22:08 2019 Temperature on Channel 9: 25.813 . . . |
Notes:
- Unlike some high end devices, the THERMOplate can not detect the presence or absence of a DS18B20 on the input. So, if your measurements are coming back with crazy values you might want to inspect your setup and confirm that your sensors are plugged in.
- The 12-bit A/D process on the DS18B20 takes just under 1 second to complete. Because of this, you should avoid reading DS18B20 values any faster than once a second.
- The setSCALE function can be used to choose global units of Centigrade, Farenheit, or Kelvin. In addition, it is possible to override the global units setting by specifying a scale in the getTEMP function. See the Advanced Topics section and the command reference at the end of this document for details.
Advanced Topics
Setting the Temperature Scale
At power up, the THERMOplate defaults to the Celsius scale for all of the temperature measurements. This can be overridden both globally and/or on a per reading basis. To change the default temperature scale for all of the readings, used the setSCALE function. For example, to get the temperature in units of Fahrenheit use:
THERMO.setSCALE(‘f’)
If you’re a physicists that needs the temperature in degrees Kelvin use:
THERMO.setSCALE(‘k’)
And finally, to return to Celsius use:
THERMO.setSCALE(‘c’)
There may be situations where you need data from certain channels using a different scale from the default. In those cases, you can add an optional third argument to the getTEMP function. For example, let’s say our scale is currently set to Celsius but we need the data from channel 1 in units of Fahrenheit:
|
1 2 3 4 5 6 7 8 9 10 |
pi@raspberrypi:~ $ python Python 2.7.13 (default, Sep 26 2018, 18:42:22) [GCC 6.3.0 20170516] on linux2 Type "help", "copyright", "credits" or "license" for more information. >>> import piplates.THERMOplate as THERMO >>> THERMO.getTEMP(0,1,'f') 76.031 >>> THERMO.getTEMP(0,1) 24.455 >>> |
Staring at the linux command line we started a python session and got the “>>>” prompt. After loading the THERMOplate module we requested the value of the thermocouple on channel 1 but added the third argument ‘f’ to the function call. The THERMOplate returned 76.031 degrees which are in units of Fahrenheit. Then we called getTEMP again without specifying a scale and the temperature value was returned using the global scale of Celsius.
Now let’s change the default scale to Fahrenheit and read the temperature again:
|
1 2 3 4 5 6 |
>>> THERMO.setSCALE('f') >>> THERMO.getTEMP(0,1) 75.791 >>> THERMO.getTEMP(0,1,'c') 24.286 >>> |
After using setSCALE, the getTEMP value was returned in the new default scale of degrees Fahrenheit. Then, in the next call to getTEMP, we requested Celsius units.
Using the Interrupt Feature for Optimal Sampling
As mentioned above, thermocouple readings are updated every 0.6 seconds (0.72 seconds in Europe) while DS18B20 values are updated every 1.0 second. In previous examples, we added a short delay between readings to ensure that we were getting “fresh” data. Using the interrupt functions of the THERMOplate allows you to read the latest values as fast as possible.
The best way to explain these features is with an example. In the script below, we set the THERMOplate up to pull down on the GPIO22 pin when it has a new reading available for two specific channels. We then sit in a loop and wait for the interrupt signal. When it goes low, we fetch and read the interrupt flags to determine which channel has a new value. We then read it and print it out along with the elapsed time. Note that reading the interrupts flags causes the THERMOplate to set the GPIO22 signal back to HIGH state.
|
1 2 3 4 5 6 7 8 9 10 11 12 13 14 15 16 17 18 19 |
import time import THERMOplate as THERMO THERMO.intEnable(0) THERMO.setINTchannel(0,1) THERMO.setINTchannel(0,9) tstart=time.time() while(1): if (THERMO.GPIO.input(THERMO.ppINT)==0): #wait for INT signal to go low reg=THERMO.getINTflags(0) #read INT flags register if ((reg & 1) == 1): #if bit 0 set then fetch #thermocouple value t1=THERMO.getTEMP(0,1) print 'Thermocouple1:',t1,'Elapsed Time:',time.time()-tstart if ((reg & 2) == 2): #if bit 1 set then fetch #DS18B20 value t9=THERMO.getTEMP(0,9) print 'DS18B20:',t9,'Elapsed Time:',time.time()-tstart |
Running the above code produces:
|
1 2 3 4 5 6 7 8 9 10 11 12 13 14 15 16 17 18 19 |
pi@raspberrypi:~ $ python intTest.py Thermocouple1: 26.26 Elapsed Time: 0.000760078430176 DS18B20-9: 26.0 Elapsed Time: 0.00114893913269 DS18B20-9: 26.063 Elapsed Time: 0.184725046158 Thermocouple1: 26.263 Elapsed Time: 0.427920103073 Thermocouple1: 26.239 Elapsed Time: 1.06262898445 DS18B20-9: 26.063 Elapsed Time: 1.1832280159 Thermocouple1: 26.242 Elapsed Time: 1.69733691216 DS18B20-9: 26.063 Elapsed Time: 2.18170189857 Thermocouple1: 26.197 Elapsed Time: 2.33200597763 Thermocouple1: 26.197 Elapsed Time: 2.96787405014 DS18B20-9: 26.063 Elapsed Time: 3.18116092682 Thermocouple1: 26.173 Elapsed Time: 3.60436606407 DS18B20-9: 26.063 Elapsed Time: 4.17862606049 Thermocouple1: 26.152 Elapsed Time: 4.2390730381 Thermocouple1: 26.156 Elapsed Time: 4.87373995781 . . . |
Controlling the LED
The THERMOplate has a single, software controlled, green LED that indicates the board is powered on and running correctly. The python modules include functions that allow you to control the state of this LED and provide some simple visual feedback on the state of your program. For example, let’s do a variation of the interrupt program we ran earlier and toggle the LED after every read of the DS18B20:
|
1 2 3 4 5 6 7 8 9 10 11 12 13 14 15 16 17 18 19 20 21 |
import time import THERMOplate as THERMO THERMO.intEnable(0) THERMO.setINTchannel(0,1) THERMO.setINTchannel(0,9) tstart=time.time() while(1): if (THERMO.GPIO.input(THERMO.ppINT)==0): #wait for INT signal to go low reg=THERMO.getINTflags(0) #read INT flags register if ((reg & 1) == 1): #if bit 0 set then fetch #thermocouple value t1=THERMO.getTEMP(0,1) print 'Thermocouple1:',t1,'Elapsed Time:',time.time()-tstart if ((reg & 2) == 2): #if bit 1 set then fetch #DS18B20 value t9=THERMO.getTEMP(0,9) print 'DS18B20-9:',t9,'Elapsed Time:',time.time()-tstart THERMO.toggleLED(0) #Toggle LED after each DS18B20 #read. |
In the last line we added the THERMO.toggleLED(0) statement. If you connect a DS18B20 to input 9 and run this code, then you will observe the LED change state once a second.
Reading the Reference Junction Temperature
In theory, thermocouple measurements assume that the temperature of the sensor's - terminal be kept at zero degrees C. Since this is highly impractical, the common approach is to connect this terminal to a thermally stable mass and monitor its temperature. We refer to this as the cold junction temperature and its value is included in the thermocouple calculations. If you want to know the cold junction temperature, simply use the getCOLD function:
|
1 2 3 4 5 6 7 8 |
pi@raspberrypi:~ $ python Python 2.7.13 (default, Sep 26 2018, 18:42:22) [GCC 6.3.0 20170516] on linux2 Type "help", "copyright", "credits" or "license" for more information. >>> import piplates.THERMOplate as THERMO >>> THERMO.getCOLD(0) 29.026 >>> |
As can be seen above, at 29°C our cold junction is actually a little warm.
Smoothing
By default, the THERMOplate applies a first order filter to each measurement coming from the thermocouple channels. This has the advantage of making the data appear smoother in plots. The disadvantage is that it will filter out abrupt temperature changes. For most people, the latter is typically not an issue since their applications are slow changing processes. If however, your are wanting to detect abrupt changes then smoothing can be disabled.
To disable smoothing use the function: THERMO.clrSMOOTH(addr)
To re-enable smoothing use the function: THERMO.setSMOOTH(addr)
A Simple Data Logger
Let’s combine some of the things we’ve learned with some Python file functions and create a simple data logger. This logger will have the following features:
- A sample rate of 1 sample every 5 seconds.
- Data collected from a thermocouple on input 1 and a DS18B20 on input 9.
- Data saved to disk as strings using the CSV format (Comma Separated Variables).
- Data collected for a total of five minutes for a total of 60 readings.
- LED toggled after each reading to visually indicate code execution.
Of course it’s a simple matter to change any of the above parameters to suit your application. Below is the code listing that is loaded with enough comments to, hopefully, make it self explanatory:
|
1 2 3 4 5 6 7 8 9 10 11 12 13 14 15 16 17 18 19 20 21 22 23 24 |
import datetime import time import piplates.THERMOplate as THERMO sampleDelay=5.0 #delay between samples in seconds Duration=5 #log duration in minutes N=int(60*Duration/sampleDelay) #Total number of samples header='Time,Count,Channel 1,Channel 9\n' #Header for CSV file fname='myLOG.csv' #Create file name f=open(fname,'w') #open file f.write(header) #write the header to the file for i in range(N): #Create a loop that collects N samples t1=THERMO.getTEMP(0,1) #Get channel 1 t9=THERMO.getTEMP(0,9) #Get channel 9 currentDT = datetime.datetime.now() # get current time structure #Below we convert all of the data into strings and add the commas needed #for the CSV file format data=currentDT.strftime("%H:%M:%S")+','+str(i+1)+','+str(t1)+','+str(t9)+'\n' print data #print data string to screen f.write(data) #write the data string to the file THERMO.toggleLED(0) #toggle the LED time.sleep(sampleDelay) #sleep until the next sample f.close() #Close the file before we exit the program THERMO.setLED(0)#Ensure LED is back on before leaving program |
After you run the above, there will be a file in the home folder called myLOG.csv. To plot your data follow these steps:
- If not already there, go to the Pixel desktop and open a file manager window by clicking on the folder icon in the task bar.
- A window will open with a list of all of the files in your /home/pi folder. Scroll down until you find myLOG.csv.
- Right click on the file name and select LibreOffice Calc

- On the next screen LibreOffice will ask you confirm the file format. Simply click OK to open the spreadsheet.

- Use the mouse to select the data in columns C, and D then click on the chart icon in the toolbar:

- When the Chart Wizard pops up, select Line, the third drawing option, and click Finish

- Now you can view the data:

- We started with the channel 9 sensor in an ice water bath and the channel 1 sensor jammed into an LED desk lamp. Then we let each sensor go back to room temperature for a couple of minutes. Finally, we swapped the position. It’s apparent that the thermocouple responds much faster to temperature changes than the DS18B20
Command Reference
This list can also be accessed by typing THERMO.getHelp() from the Python command line:
Definitions:
addr: Address - THERMOplates have jumpers on the board that allow
their address to be set to a value between 0 and 7.
channel: Each THERMOplate has twelve individually addressable inputs
numbered 1 through 12. Channels 1 through 8 are Type K thermocouple
inputs while channels 9 through 12 accept the DS18B20 digital
temperature sensor.
scale: the THERMOplate can return measurements in three different temperature
scales: Celcius, Farenheit, and Kelvin. At power up, the board will
default to Celcius. If a function requires a scale setting then the
argument is a simple character enclosed in single quotation marks: 'c',
'f', or 'k'. Note that the scale argument is optional for the getTEMP()
and getCOLD() functions and will default to the global setting if not
included as an argument.
value: many functions will return a value. For example, getTEMP() returns a
the temperature value of the selected channel as a decimal number.
Other functions may return a string of characters or a single integer
Value.
freq: to minimize power line noise, the THERMOplate averages multiple
readings during power line cycles. In North America, the line frequency
is 60Hz (the default value) while in Europe and other parts of the world
the frequency is 50Hz.
type: the THERMOplate can measure temperature using both K type and J type
thermocouples. Valid arguments are ‘k’ and ‘j’. Be sure and include the
quotation marks.
Temperature Read Functions
getTEMP(addr,channel,scale*) - returns the measured temperature of the
specified channel. If the optional scale argument is included, it will
override the global scale specified by the setSCALE function.
setSCALE(scale) - sets the temperature scale for all of the THERMOplates
attached to the Raspberry Pi. This is a global value that applies to all
temperature measurements unless a different scale setting is passed to
the getTEMP or getCOLD functions.
getSCALE(scale) - returns a single character which indicates the current
temperature scale being reported by all of the THERMOplates.
setTYPE(addr,channel,type) - sets the thermocouple type for a specific channel. Since
This only applies to thermocouple inputs, an error message will be generated if
the channel argument is not between 1 and 8.
getCOLD(addr,scale*) - returns the temperature of the cold junction on the
addressed THERMOplate. If the optional scale argument is included, it
will override the global scale specified by the setSCALE function. See
the documentation for the purpose of this temperature.
setLINEFREQ(addr,freq) - instructs the THERMOplate to collect samples over
1/60 of a second or over 1/50 of a second. The default value is 60 for
North America. It should be set to 50 if you are in the UK or Europe.
Note that this function only needs to be called once at the beginning
of your program.
setSMOOTH(addr) - instructs the THERMOplate to apply a smoothing filter to
each thermocouple channel. This feature is on by default.
clrSMOOTH(addr) - instructs the THERMOplate to pass the raw data from each
thermocouple channel.
Interrupt Functions
setINTchannel(addr, channel) - directs the THERMOplate to pull the INT line
(pin 15 on the Raspberry Pi) low when a new temperature value is avail-
able for the selected channel
intEnable(addr) - enables the INT feature on the addressed THERMOplate.
intDisable(addr) - disables the INT feature on the addressed THERMOplate.
getINTflags(addr) - returns an 8-bit value which indicates which thermocouple
or a digital sensor generated an INT. The bits in this register are:
|
1 2 3 |
________________________________________ |NA|NA|NA|NA|NA|NA|DS18B20|Thermocouple| ¯¯¯¯¯¯¯¯¯¯¯¯¯¯¯¯¯¯¯¯¯¯¯¯¯¯¯¯¯¯¯¯¯¯¯¯¯¯¯¯ |
After this register is read from the THERMOplate, the bits are cleared.
LED Control Functions
setLED(addr) - turn on the LED
clrLED(addr) - turn off the LED
toggleLED(addr) - if LED is on, turn off. If LED is off, turn on.
getLED(addr) - returns current state of LED - 1 is ON and 0 is OFF.
System Level Functions:
getID(addr) - return Pi-Plate descriptor string
getFWrev(addr) - return FW revision
getHWrev(addr) - return HW revision
getVersion() - returns revision of python module
getADDR(addr) - return address of pi-plate. Used for polling available
boards at power up.
RESET(addr) - set THERMOplate to power on state. Returns temperature scale
to Celcius.